If you can use a sewing machine, you can make nice looking, durable, spherical beanbags to suit your personal taste. These instructions are intended for those with little sewing experience. The author had next to none until he learned to make beanbags for himself and friends. This document represents what was learned in the process of making 60 or 70 beanbags over the last few years.
You'll need:
First, choose your fabric. Look at bargain and scrap tables in a fabric store and you'll find a large variety of colors and fabrics at very low prices. If you are going to use more than one color, try to find the same type of cloth or your beanbags will stretch out unevenly. Cotton cloth of moderate thickness works well.
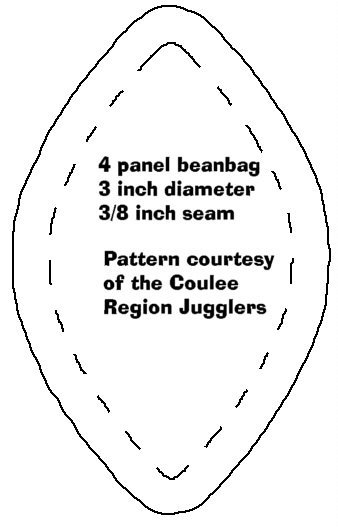
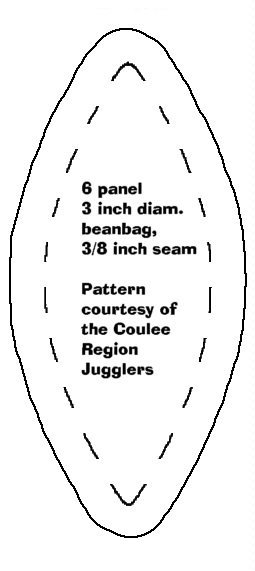
Now prepare your pattern. Here are some patterns. Choose one, print it out, glue it to a piece of tagboard, (the back cover of a spiral-bound notebook works well) and cut it out carefully:
The rest of this document assumes you've chosen a 4 panel pattern. I'll leave the differences between making a 4 panel and 6 panel beanbag as an excercise for the reader. Actually, I've never bothered to make a 6 panel beanbag myself, but it shouldn't be too difficult if you are sew inclined. Sorry about that- ever since I've been juggling, I've had an unexplained attractions to puns.
Next you'll need to trace and cut out your cloth panels. You may want to make only enough for one beanbag at first to see if you've chosen a good size and fabric. If you like the results, make a bunch more. In any case, iron your cloth. Use the cardboard-backed pattern to trace out as many panels as you will need (4 for each beanbag you'll be making) using a felt tipped pen. Cut out the panels of cloth.
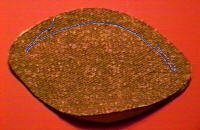
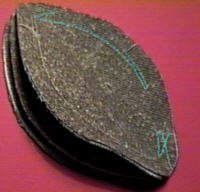
Time to sew. Set your sewing machine for a fairly small stitch. Choose a strong thread of a color that will blend well with your cloth. Lay one panel on another, with the surfaces you want on the outside facing each other. In the example shown, the cloth is brown on what will be the inside of the bag and white what will be the outside. Sew a seam 3/8 of an inch from one side of the panel, starting and stopping by doubling back a bit to secure the thread, like this: (the seam is highlighted in blue)
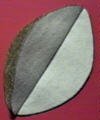
Cut off the excess thread, and firmly fold the top panel in half, like this (the seam you've just done is hidden under the fold on the left.)
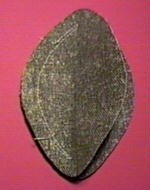
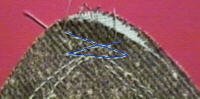
Lay down a third panel and line it up carefully. Use the same method to attach this panel to the piece as you used to stitch the first two together, being careful not to sew past the center of the panel. When you are done, the piece should look like this:
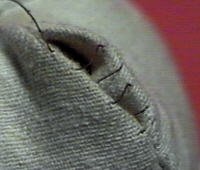
Again, fold a panel over to expose half of the newest panel, lay down the fourth panel and sew it on the same way. Sew the last edge in two seams, doubling back at each end of each seam to secure the thread. Leave a section about 3/4 of an inch long unsewn:
Fold the beanbag so you have equal layers on each side (4 layers of cloth on each side.) Stitch back and forth a few times near where the seams meet. This will ensure that there are no leaks in the ends of the beanbags.
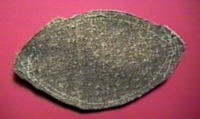
Next, prepare the bag for filling. Cut off any excess threads, and trim the excess cloth about halfway to the seam (avoiding the thread-securing stitches.) This trimming is optional, but it will help produce a smoother, rounder beanbag:
Turn the bag right-side-out through the gap you left in the final seam. Pushing it from the other side with the eraser end of a pencil works well.
Next, choose your filling. A great choice is finely crushed walnut shells, which you can purchase at gun shops that carry reloading supplies. It's available plain and treated with polish. Do not use the treated type, as your beanbags will leak puffs of waxy dust. Another good source for plain crushed walnut shells is your local pet store. Crushed walnut shells are used for litter in bird cages, and also for lizards. Wouldn't you like to tell people you juggle lizard litter? I thought so. Clean, dry sand works very well if you have a tough fabric and want a heavier beanbag. Another option is bird seed. Millet is a popular choice. Avoid anything with dyed seed, like the bright red seeds in parakeet mix, as the dye will stain your fabric if the balls ever get the least bit damp. Avoid any dusty filling, and stay away from rice, peas and anything else that's likely to mold if it gets damp.
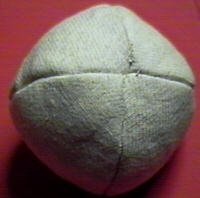
With your funnel, fill the first beanbag to the firmness you prefer. The more tightly you fill it, the more spherical it will be, but tightly packed beanbags also wear out sooner. Loosely filled beanbags are excellent when it comes to catching several in one hand. Those members of our club that have flashed 9 have done so with very loosely filled beanbags. Note that as beanbags break in, they loosen up a bit, so you should fill them just a bit firmer than you really want them to be. Once you have filled the first beanbag, weigh it. Use the scale to ensure that the others you make are filled to the same weight.
Now close the beanbag with the needle and thread. You have one last decision to make. Do you want to spend a little extra time to make an invisible closing seam, or get these done quick with an outside seam?
Generally an outside seam will work fine and be fairly inconspicuous. For the outside seam, run the needle through both adjacent panels with each stitch. The closing seam is usually the first spot to leak on a beanbag, so take your time and tie good knots at both ends of the seam. I like to stitch across the closure in one direction, tie off the thread and then stitch back again.
If you want the invisible seam, each stitch of the needle should go through only one panel and into the bag, forward a bit, then out again. Alternate the stitches between the two panels:
When you pull the thread tight (don't overdo it) the two panels will pull together with all the stitches on the inside. Tie a knot, then use the needle to pull the end of the thread inside the beanbag right at the knot.
Juggling the beanbags: Throw and catch as necessary to keep at least one in the air at all times. Seriously, check out the rest of the Coulee Region Jugglers and Unicyclists site for juggling help.
The Coulee Region Jugglers and Unicyclists (crju@jugglingpoet.com) 5/02